Creating a VM Template in Proxmox to use with Terraform
Preface
At some point I want to blow away my old Proxmox cluster and rebuild it— maybe as Proxmox with Ceph? Maybe Harvester? Who knows. For now, I’m using a basic 4 node Proxmox cluster(without ceph) that I already have running configured with a couple NFS shares.
Create an Ubuntu VM Template
Open up the CLI for your Proxmox host and pull down the latest Ubuntu LTS cloud image. You can use the GUI and go to the “shell” under the host or you can use putty to ssh to it. I prefer putty because it doesn’t constantly close and reopen my session the second I click away, but the GUI is much more convenient.
As of this writing, the latest LTS is Focal Fossa(20.04) and will be EoS in April 2025. You can find the latest releases here.
wget https://cloud-images.ubuntu.com/focal/current/focal-server-cloudimg-amd64.img
Next we’ll want to inject the qemu-guest-agent into the image. This lets us get info like the IP address of the guest NIC right from the Proxmox GUI. To begin, we need to update APT and then install libguestfs.
1
2
apt update -y
apt install libguestfs-tools -y
Then inject the guest agent into the image we just downloaded
virt-customize -a focal-server-cloudimg-amd64.img --install qemu-guest-agent
For the next several steps we’ll use QM to build a VM and convert it into a template. Lets start with creating a new VM with an ID of 9000 as I’m not using anything in that range. I’m going to call it “ubuntu-micro” and give it really low specs. Even if I need something bigger, it wont matter since I can just give it more resources with Terraform at the time of cloning. I’m using the default vmbr0 bridge that exists when you set up Proxmox.
qm create 9000 --name "ubuntu-micro" --memory 1024 --cores 1 --net0 virtio,bridge=vmbr0
I have an NFS share on my Proxmox cluster called VirtualMachines. If all you have is “local-lvm”, go ahead and take a look at these instructions. This NFS share is a large share, but it’s spinning rust so I use it to store things that aren’t accessed frequently. For this guide I’m going to use the NFS share for the template as we can just copy it to the local NVME later when we use Terraform. By default “qm importdisk” will create a RAW format for the disk and I don’t prefer that so instead lets create a qcow2 disk for our template by specifying it:
qm importdisk 9000 focal-server-cloudimg-amd64.img VirtualMachines --format qcow2
And now we’ll attach that disk to the VM
qm set 9000 --scsihw virtio-scsi-pci --scsi0 VirtualMachines:9000/vm-9000-disk-0.qcow2
We’ll set some more settings like what the VM should boot to, directing the console to the serial socket, enabling the guest agent, and adding the cloud-init image. This is an IDE cdrom drive and a special image so we didn’t need to create it above.
1
2
3
4
qm set 9000 --boot c --bootdisk scsi0
qm set 9000 --ide2 VirtualMachines:cloudinit
qm set 9000 --serial0 socket --vga serial0
qm set 9000 --agent enabled=1
Finally, lets convert the vm to a template
qm template 9000
To try it out, we’ll clone the template and then delete it later
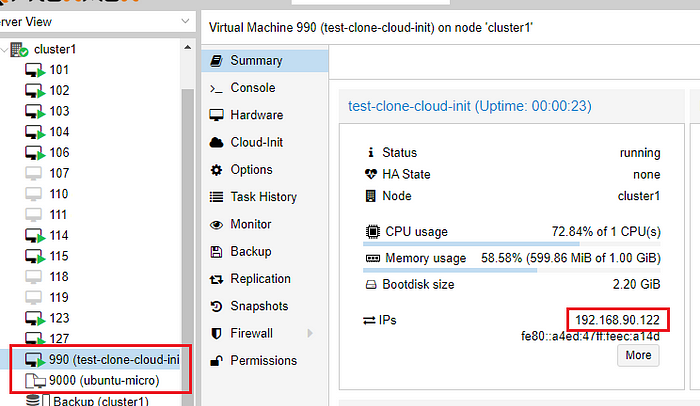
qm clone 9000 990 --name test-clone-cloud-init
Now check the GUI to see if that was a success
Next we’ll use cloud-init to assign user/pass(optional), SSH keys and an IP address. If you want a second NIC, add another line using ipconfig1 and so on. If you have specific keys you want to use, specify them here. I had to upload the keys using SCP to the Proxmox host in order to use them. I assigned an IP address, default gateway, specified DNS info(optional), and started the vm!
1
2
3
4
5
6
7
qm set 990 --ciuser randy
qm set 990 --cipassword change-me
qm set 990 --sshkey ~/.ssh/change-me.pub
qm set 990 --ipconfig0 ip=192.168.90.122/24,gw=192.168.90.1
qm set 990 --nameserver 192.168.90.90
qm set 990 --searchdomain mylab.home
qm start 990
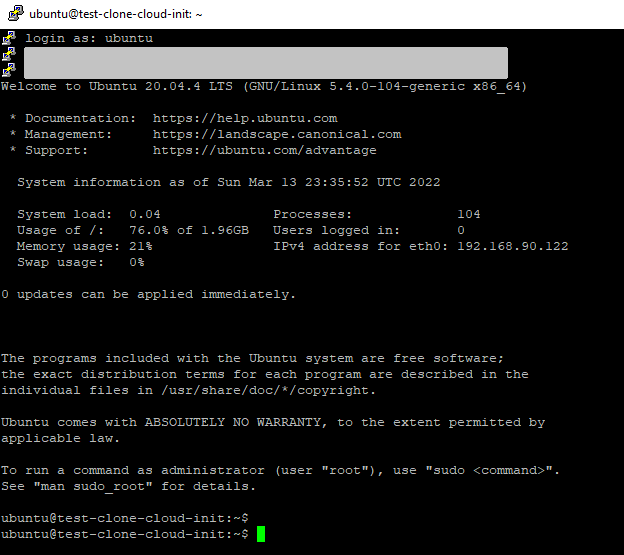
If everything was successful you can now SSH into the VM with putty configured with your ssh key. If you didn’t specify a username above, the default will be “ubuntu”.
References
Cloud Init Support - https://pve.proxmox.com/wiki/Cloud-Init_Support